We love us some paper here at PMC. As much as I adore premium papers, they can be pricey for a struggling artist or designer. Plus, most artistic types love the hands-on DIY approach. For these reasons I got off the coach on a Sunday to attend a papermaking workshop at the Valley Print Studio. Now I’m knowledgeable enough to show you how to make your own paper!
Papermaking home instructions
Well, probably not. I didn’t have time to take notes. Fortunately, you can download a PDF version of step by step instructions here.
Before you get started, I want to bring you my observations of the project from the sidelines.
VPS is a local creative hub in the Woodland Hills area of Los Angeles. The Studio sits beside a nice home south of Ventura Blvd. in a neighborhood with quaint surroundings. Director Zeina Baltagi and her partner Miles Lewis host regular classes on everything from lithography to abstract photography. I heard about the papermaking class on the Valley Print Studio Facebook page. Naturally, this print geek couldn’t pass up an opportunity to get a behind the scenes look at the papermaking process! Zeina was kind enough to let me crash her paper party and share the experience with the PMC community. Everybody say, Thank you Zeina!
Papermaking in pictures
Zeina kicked off the class with a run through of the necessary supplies. She explained that you can make paper by recycling throw away stuff, such as old newspapers. Obviously, you’ll get better results with high quality materials, so keep that in mind. I thought newspapers, books, or magazines would produce good results, but apparently you need to shoot for acid-free cellulose fiber (archival paper) to avoid decay down the road. Typical commercial paper contains a polymer called lignin, which must be removed to avoid brittleness. If you’ve ever felt an old newspaper clipping crumble in your hands, now you know why from a scientific standpoint.
Participants got their first taste of homemade paper pulp from old dryer lint! You know, that blueish grayish stuff you pull out of the lint catcher when you do laundry:

Zeina collected a ton of lint and mixed it with water in the bucket pictured above. Then she pulverized the mixture in a blender:

The blender action might seem tempting if you’re hungry…I was told the deep purple linen doesn’t develop the rich grape flavor you’d expect. No matter because you’re just going to dump the pulp in a tub of water to get the finished product. The more pulp you pour in, the thicker your canvas. Everybody got a little wet at that point; you have to immerse yourself in messiness for art’s sake I guess. At least they did, I didn’t get so much as a drop of ick on me. Nobody seemed to mind, though. Everyone looked pretty happy as they played around in the pulp:

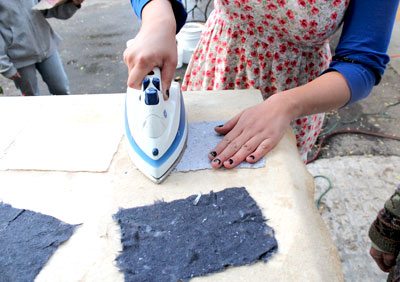
The wooden object with the screen inside is called a deckle. They’re supposed to be easy to put together, but you can buy one at an art supply store if you don’t feel up to the task. I would because woodworking sounds scary. I mean, you might get a splinter! Anyway, the deckle houses your freshly prepared sheet. You’ll submerge the wooden contraption, shake it around, then carefully soak up the excess water with a sponge when you’re done. The delicate paper must be gently pulled off the deckle leaving only the metal screen. Finally, you press the sheet to a flat piece of fabric and let it dry out. Don’t try to mess with the paper before it dries completely. You have to the let the sheet sit for at least 10 or 15 minutes before you to move it. A few artists ended up having to start over because they didn’t wait long enough. Even after a reasonable wait time, you might have to break out the iron:

Some people added a unique twist by embedding flowers into the sheet, as seen in the photo. You can toss extras into your pulp, such as glitter, leaves, etc. or iron on an impression. I believe the flowers in the image were mixed in with the pulp. The artist ended up trying to iron them in, but the stem wouldn’t take.

Best handmade paper project examples for your inspiration
I met a lot of talented people at the Valley Print Studio. Zeina mentioned that artists tend to be recluses, and I believe there’s a degree of truth to that stereotype. Yet this event attracted a friendly group who didn’t appear to mind my intrusion at all. No one asked me not to take his or her picture, which almost always happens when I photograph people in public places. Two ladies in particular let me watch them work from start to finish.
Kris Hammeras-Hogarth of Pica Design Studio totally rocked the house with a paper piece in the shape of a fish (or dolphin?):

Her creative approach caught my eye instantly. I must’ve missed her molding the figure because I didn’t realize what she’d done until she laid her sheet to dry. She happily posed with her aquatic creation, and I hope she’ll let me know what she decided to do with it. She’s the only person out of 14 or so who didn’t go for the usual rectangle—her innovation deserves a PMC salute!

Phyllis Hansen’s project was pure punk rock. She embedded shredded money of unknown origin into thick, textured paper. She wouldn’t say where the cash came from, but it definitely looked legit when I inspected the container. I made out the words “All debts public” on a single sliver. I stood in awe as she sprinkled more green on top of the sheet and pushed the stray pieces in with an iron. I’m not sure what kind of statement she wanted to make, but I’m sure I’ll never forget what I witnessed.
I hope you feel inspired to try this at home. Until next time #printgeeks, stay inky!


